

Email account setup on Android 5.x.x (Lollipop) (SMTP/IMAP/POP3)
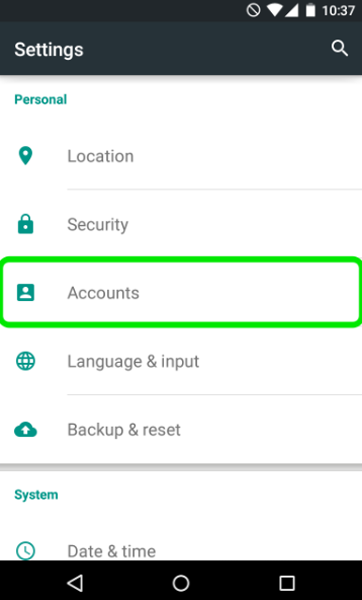
1. Open Settings of your Android device and tap on Accounts menu in section Personal:
2. Tap on Add Account at the very bottom of the screen:

3. On the next screen you will need to choose whether you wish to configure IMAP or POP3 account.
Simply choose the desired option by tapping on Personal (IMAP) or Personal (POP3) correspondingly:

4. The next screen will prompt you to enter your email address. Make sure to type in full Private Email address:
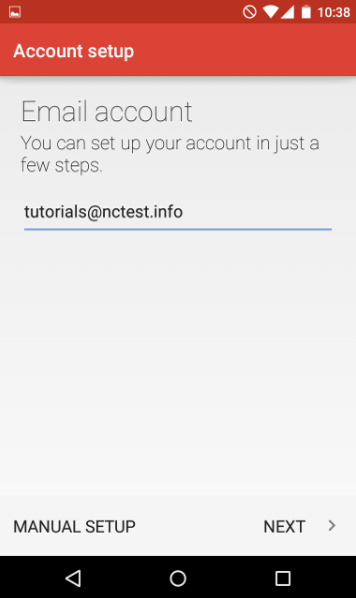
5. Once done, tap Next to proceed to the next step.
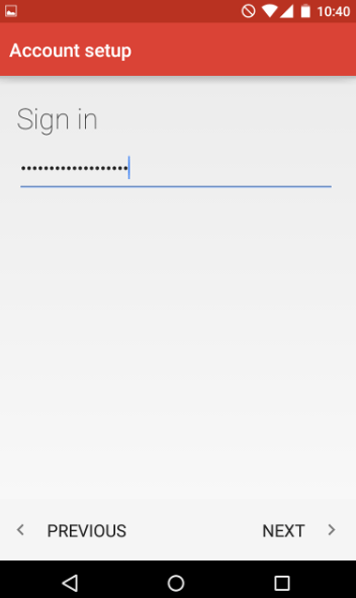
6. Here you will need to indicate your email account password.
NOTE: if by any chance you do not remember your password, you can easily reset it using the following tutorial.
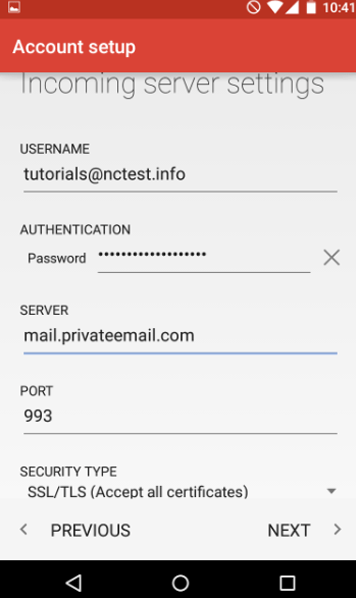
7. Here you will need need to type in correct IMAP/POP3 settings depending on the option you choose.
Make sure to use the following settings for IMAP:
Username: full email address
Password: password for this mailbox
Server: mail.privateemail.com
IMAP Port: 993
Security Type: SSL/TLS (Accept All certificates)
8. If you decided to use POP3 protocol, the following settings should be indicated:
Username: full email address
Password: password for this mailbox
Server: mail.privateemail.com
POP3 Port: 995
Security Type: SSL/TLS (Accept All certificates)
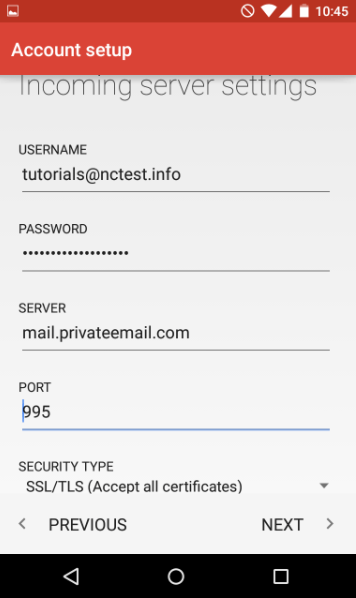
9. Once done, tap Next to verify the settings and proceed to Outgoing Server settings menu.
10. Here you will need to fill in the corresponding fields as shown below:
SMTP Server: mail.privateemail.com
Port: 465
Security Type: SSL/TLS (Accept All certificates)
Username: full email address
Password: password for this mailbox
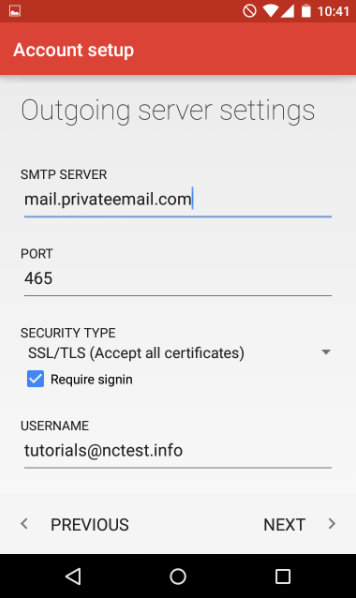
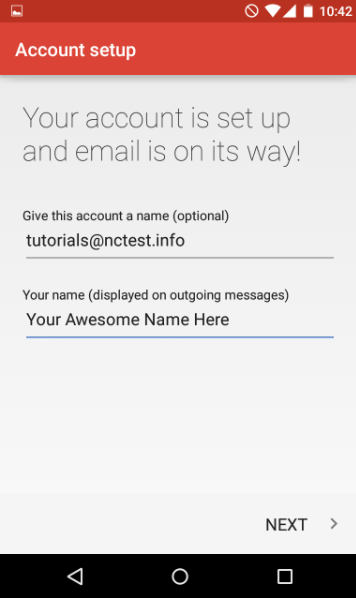
11. Once ready, tap Next to verify SMTP settings and finish the account setup:

Setting up an email account on Android 5.x.x (Lollipop) involves configuring SMTP, IMAP, or POP3 protocols, depending on your email provider’s settings. This guide will walk you through the step-by-step process to ensure your email is properly set up and functional on your Android device.
Introduction to Email Setup on Android 5.x.x (Lollipop)
Email setup on Android devices running Lollipop (5.x.x) is essential for accessing your emails on the go. Whether you’re configuring a Gmail account or another email service that uses SMTP, IMAP, or POP3 protocols, this guide will provide detailed instructions to help you seamlessly integrate your email into the Android environment.
Part 1: Understanding SMTP, IMAP, and POP3
Before diving into the setup process, it’s crucial to understand the basic protocols used for email retrieval and sending:
- SMTP (Simple Mail Transfer Protocol): Used for sending outgoing emails.
- IMAP (Internet Message Access Protocol): Syncs emails across multiple devices while keeping them stored on the server.
- POP3 (Post Office Protocol version 3): Downloads emails from the server to your device, typically removing them from the server unless specified otherwise.
Part 2: Setting Up Email on Android 5.x.x (Lollipop)
Steps for Email Account Setup:
-
Accessing Email Setup:
- Open the Settings app on your Android device.
- Scroll down and tap on Accounts.
- Select Add account.
-
Choosing Email Provider:
- Depending on your email provider, select Email or the specific email service provider (e.g., Gmail, Yahoo Mail, Outlook).
-
Entering Email Address and Password:
- Enter your full email address and password.
- Tap Next.
-
Selecting Protocol:
- Choose the protocol based on your provider’s recommendation:
- IMAP: Syncs emails across multiple devices.
- POP3: Downloads emails to your device.
- Choose the protocol based on your provider’s recommendation:
-
Incoming Server Settings:
- IMAP:
- Username: Your full email address.
- Password: Your email account password.
- IMAP Server: Provided by your email provider (e.g., imap.youremailprovider.com).
- Security Type: SSL/TLS (recommended).
- Port: 993.
- POP3:
- Username: Your full email address.
- Password: Your email account password.
- POP3 Server: Provided by your email provider (e.g., pop.youremailprovider.com).
- Security Type: SSL/TLS (recommended).
- Port: 995.
- IMAP:
-
Outgoing Server Settings (SMTP):
- SMTP Server: Provided by your email provider (e.g., smtp.youremailprovider.com).
- Security Type: SSL/TLS (recommended).
- Port: 465.
- Require sign-in: Checked.
- Username: Your full email address.
- Password: Your email account password.
-
Account Options:
- Set options such as sync frequency, notifications, etc., based on your preferences.
- Tap Next.
-
Account Name and Finish:
- Enter a name for your email account (e.g., Work Email, Personal Email).
- Tap Finish.
Part 3: Troubleshooting Common Issues
Common Issues and Solutions:
- Authentication Errors: Double-check your email address and password.
- Connection Problems: Ensure proper internet connectivity or try switching between Wi-Fi and mobile data.
- Incorrect Server Settings: Verify server settings with your email provider.
- SSL/TLS Certificates: Ensure they are up to date and valid.
Part 4: Advanced Settings and Customization
1. Advanced Email Settings:
Once you’ve completed the basic setup, delve into advanced settings to tailor your email experience further:
- Sync Frequency: Adjust how often your device checks for new emails to balance battery life and real-time updates.
- Email Retrieval Size: Define the amount of data fetched per email to manage mobile data usage efficiently.
- Folders to Sync: Customize which folders (Inbox, Sent, Drafts, etc.) are synchronized with your device for streamlined access.
- Delete Email from Server: Decide whether emails should be retained on the server after downloading them to your device, providing flexibility in managing storage.
2. Security Considerations:
Email security is paramount to protect sensitive information and ensure privacy:
- SSL/TLS Encryption: Enable SSL/TLS encryption for both incoming (IMAP/POP3) and outgoing (SMTP) servers to safeguard data during transmission.
- Two-Factor Authentication (2FA): Strengthen account security by enabling 2FA where available, requiring a secondary verification method alongside your password.
- Device Security: Maintain robust device security with up-to-date software updates and antivirus protection to mitigate risks from malware and unauthorized access attempts.
3. Managing Multiple Email Accounts:
Android devices excel in managing multiple email accounts concurrently:
- Adding Additional Accounts: Easily integrate additional email accounts using the same streamlined setup process outlined previously.
- Unified Inbox: Utilize the unified inbox feature offered by some email apps to consolidate emails from multiple accounts into a single view for efficient management.
- Separate Email Apps: Opt for distinct email apps for different purposes (e.g., personal, work) to maintain organization and separation of communications.
Part 5: Benefits of Using Email on Android Devices
1. Accessibility and Mobility:
Accessing emails on your Android device enhances productivity and connectivity:
- Real-time Access: Stay connected and responsive with immediate access to incoming emails wherever you are.
- Cross-Device Sync: Emails synchronize seamlessly across your Android device, desktop, and other devices, ensuring consistent access and updates.
2. Integration with Android Ecosystem:
Android’s integration capabilities enrich email functionality and usability:
- Notifications: Receive timely notifications for new emails, ensuring prompt responsiveness.
- Calendar Integration: Link your email account with the Android calendar app for streamlined scheduling and event management.
3. Productivity and Collaboration:
Email usage on Android facilitates productivity and collaboration efforts:
- Attachment Handling: Effortlessly send and receive attachments such as documents, images, and videos directly from your device.
- Threaded Conversations: Navigate email threads effortlessly to track conversations and responses, fostering efficient communication and collaboration.
Part 6: Best Practices for Email Management on Android
1. Organizing Emails:
Implement effective strategies to maintain a clutter-free inbox and optimize email management:
- Folder Organization: Create and utilize folders or labels to categorize emails by type, priority, or project, simplifying retrieval and reference.
- Archiving and Deleting: Archive important emails for future reference, while regularly deleting unnecessary emails to conserve storage space and streamline inbox management.
2. Managing Email Storage:
Optimize email storage on your Android device to ensure optimal performance and efficiency:
- Clear Cache: Periodically clear the email app cache to free up storage space and optimize app performance.
- Storage Settings: Configure email storage settings to manage how emails and attachments are stored locally, balancing storage allocation and accessibility.
3. Backup and Restore:
Safeguard email data against loss or device issues with comprehensive backup and restoration practices:
- Cloud Backup: Utilize cloud storage services to backup email data, contacts, and settings, ensuring data accessibility and recovery in case of device replacement or data loss.
- Restoration Options: Familiarize yourself with procedures to restore backed-up email data effectively, safeguarding against unforeseen device issues or data corruption.
Part 7: Troubleshooting and Common Issues
1. Email Sync Issues:
Resolve issues related to email synchronization for uninterrupted access and functionality:
- Sync Settings Verification: Verify and adjust email synchronization settings within the email app to ensure timely retrieval and update of emails.
- Restart Device: Reboot your Android device to refresh system processes and connections, potentially resolving temporary synchronization interruptions.
- Check Internet Connectivity: Ensure stable and reliable internet connectivity (via Wi-Fi or mobile data) to support continuous email synchronization and communication.
2. Authentication and Login Problems:
Address login and authentication challenges to regain access to your email account:
- Credential Verification: Double-check the accuracy of entered credentials, including email address and password, ensuring correct input to facilitate successful account authentication.
- Security Verification: Complete any additional security measures, such as CAPTCHA challenges or verification codes, to authenticate account access and address security-related login issues effectively.
3. Server Configuration Errors:
Rectify server-related configuration errors to restore email functionality and ensure seamless communication:
- Server Settings Verification: Review and validate server settings, including incoming (IMAP/POP3) and outgoing (SMTP) server addresses, ports, and encryption protocols (SSL/TLS), to ensure accurate configuration and optimal email server connectivity.
- Technical Support Assistance: Seek assistance from your email service provider’s technical support team or customer service to troubleshoot and resolve server configuration errors or issues affecting email functionality.
